
Have you ever looked at these in the grocery store and thought they were fall decorations that go next to the bumpy little gourds by the indian corn? I did for a really long time. Aside from their odd shape, they really aren't much to look at. Their drab color doesn't do much for them either. But once you get to know this gourd, you might find that it holds a lot of interest. It's mighty nutritious. Go here for more information on that, you won't be sorry. There are many ways to cook and serve it. My biggest goal in this particular blog, is to dispel the mystery on how to use it. My family likes it roasted, so that's what we're going to do.

Before you start, make sure you place a damp paper towel under your cutting board. This will keep your board from sliding as you maneuver this odd shaped vegetable.

There are two ways to peel it. You can use a pairing knife or a peeler. When using a knife, number one... use extreme caution. The outside layer is slick and hard. Peel around the top first.

Then run your knife down the side to the place where the squash bumps out.

Once you have peeled the top portion, cut it off so that the bottom is easier to handle.

Then use your knife to peel around the bottom. Again using extreme caution.

Now I don't know how many of you have this kind of peeler, but I am still questioning myself as to why I waited so long to get one. Maybe because it's not what I grew up using in my mom's house. But I broke down and bought one so I could see if it would make the job of peeling this monster easier. DON'T WAIT!!! Go buy yourself one right now! I will never be without this kind of peeler again.

It made ridiculously quick work of this squash. I almost had tears in my eyes it went so fast. Again... GO BUY ONE NOW!!!

I can't believe how struggle free it was. All done peeling in a matter of minutes and way safer. However, a side note would be that when I have used this peeler on smaller items like apples, I took a nice chunk out of my finger. So use a little more caution with the smaller produce.

Take the top portion of the squash and cut it in 1/2 inch slices.
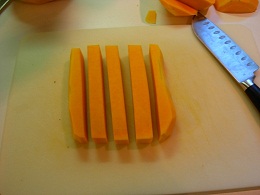
Then cut those in 1/2 inch slices

Then 1/2 inch chunks.

Next cut open the bottom half. This will look like the inside of a pumpkin since they are both squashes.

Use a spoon to scoop out the insides and discard. I suppose you could clean them off and roast them or dehydrate them like pumpkin seeds, but I've never tried it.

Cut the little bottom buttons off.

Then slice the bottom half into 1/2 inch slices.

Turn them on their sides for safety and cut these, one by one, into 1/2 inch pieces.

Throw them in a bowl, toss with some olive oil, sea salt and fresh cracked pepper.

Layer on a baking sheet and roast at 400 degrees for 45 minutes to an hour.

This is what not to do! I put too many on this sheet and when they were done roasting, some were burned and some were just soft. None of them caramelized and got yummy and sweet. Look back at the oven shot and see how they were sitting on top of each other. Now look at the picture below.

These are all in a single layer. They are crowded, but most importantly, they are in a single layer.

If you look at this, the only ones that burned were some small ones on the outside edge (that's normal). The other ones shrunk beautifully and caramelized like a champ. I serve these just as they are as a side to some sort of protein. If they aren't quite sweet enough for your young ones, you can drizzle a small amount of local maple syrup or some raw honey on top. We seem to do just fine without that though.
I really hope you try this if you've never liked this squash before (pureed, uck!) And if you've never tried it, I hope you will give it a go.
No comments:
Post a Comment