Showing posts with label summer. Show all posts

Monday, September 27, 2010

Zucchini & Yellow Squash


This is about the time of year when you run out of ideas of what to do with the bumper crop of squash you have raked in. There's the ever faithful Zucchini Bread recipe (I'm a huge fan) and I've even heard of Chocolate Zucchini Muffins. But at our house, we like yellow squash too and the two seem to go hand in hand.

This is a fast and easy way to make a healthy side dish that is full of flavor. Do you have one of these? It's called a mandolin. It makes quick work of items that need sliced thinly. If you don't have one, a sharp knife will do the job.


I use the mandolin to slice the zucchini right into my sauté pan. Discard the bottom and use the stem to hold on to while you are slicing.


Do the same with the yellow squash. However, you will notice that this one started to get a little big because there are seeds developing. It really is true that you want to pick the smaller squashes than larger. It still tastes good, but they just don't look as nice when they cook up.


Depending on how well you like garlic, put in as much as you like. But it is best to use fresh when doing a dish like this. Just give it a good whack to get the shell off and then either mince or press it right into the pan with the squash.


Depending on how much heat you want, add some red pepper flake. Even if you think you don't want it spicy, just add some to give it a little life. And then drizzle with olive oil.


Now this is the point where you put the lid on and let it steam on medium high. But if you're me, your biggest sauté pan did not come with a lid. So I cover it with foil and let it vent out the back. Take the lid/foil off every once in awhile to stir things up. I'm a fan of tongs. They are great for grabbing and flipping things. Think of them like extended hands that won't get burned. A very useful tool.


Once the squash gets transparent, they are pretty much done. You can serve this with fresh sliced tomato and a little freshly shredded Parmesan cheese. This is best piping hot, so make sure it is the last thing you finish before you plate your dinner.


It really is low maintenance and a fast way to use up your surplus garden stock. Enjoy!

Thursday, July 29, 2010

Beautiful Bounty

I have heard others speak of going to a farmer's market and thought, who would seriously want to go shop somewhere where you are only buying vegetables that could comfortably be bought at my local grocery, in the air conditioning with all the other things that I needed to buy on my list. But it wasn't until I went that I realized the variety of items you could purchase. The biggest pull of course is the local produce, but there are also, free-range meats, homemade jams, scratch made pastries, bagels, breads, local honey, flowers, local maple syrup, and items made all from beeswax.

What is great, is that I have pretty much replaced my grocery store shopping with the farmer's market. I have only bought a few items from the store the past few weeks to supplement my menu plans.

Below is a picture of the beautiful bounty I brought home left to right, front to back:
garlic, green tomato, red tomato, hot peppers, green tomato, beets, asiago cheese bagels, zucchini, yellow squash, free-range ground beef, 2 dozen ears corn


Since my kiddos were spending the night at grandma's, a big plate of veggies was perfect for dinner. Roasted beets, sautéed yellow squash & zucchini with garlic and fresh tomato with balsamic vinegar.


The tomato was so flavorful with the balsamic vinegar & fresh cracked pepper. But, some of the vinegar leaked over to the beet side of the plate and that did not make the beets taste good to me. A tiny drizzle of local honey made it better.


Do I usually eat a plate of just veggies for dinner? No. But I figured since I had an ice cream cone for lunch that this was probably my best choice. LOL! Some day I will learn, but I'm doing better than I was before.

Monday, July 26, 2010

Roasted Beets

Here's a great way to start a food blog... I'm not a fan of beets.

At least I'm not a fan of how other people make them. Beets come canned, in balls as a garnish in a salad, as Harvard Beets and probably some other ways I don't want to try. None of these have captured my fancy. However, I read an article in Martha Stewart's Living magazine a long time ago that touted the wonders of roasting vegetables and it changed my perspective on many veggies I have disliked in the past. One in particular is butternut squash. I turned my nose up to every way I had ever tasted it, until I roasted it and now we love eating it. We've also roasted parsnips, carrots, and leeks and have had great success with those too.

My drive in trying the beets roasted was that I had learned the deeper the color of your veggie, typically the more nutrients they pack in. The darker your lettuce, the more worth eating it is. Iceberg lettuce is a waste of time. It's like eating crunchy water... just say no. So when I was picking my way through our local farmer's market, which by the way carries more than fruits & veggies, I noticed a small organic stand. Truth be told, it was the only organic stand there. What a sad statement. However, the produce they (ahem) produced, was beautiful. They are smaller, not perfect, and not blown up and out of proportion to suit the likes & tastes of American consumers. What caught my attention were these small, almost golf ball sized beets. I simply had to buy them. This was my opportunity to give these deep colored menaces one final chance on my plate. I am so glad I did. Enjoy the journey of color below!

Only wash your beets when you're ready to roast them. It's the same concept as strawberries. They go bad quicker once they've been washed.


I run them under warm water and use a scrubby to scrub all the dirt off. You're supposed to peel them, but if they're organic I don't see the point. They were delicious this way and didn't need peeled. But do as you like... it's your beet :)


As I scrubbed them, I laid them on a paper towel to drain. It was like watching tie-dying happen because they "bleed" their liquid once scrubbed.


Because the liquid does stain, I use a kitchen glove on one hand. Cut off the top & the bottom.


Then cut in half, then slices, then cubes. They were around 1/2 inch square.


Put the cubed beets in a glass bowl. Why glass? So it doesn't stain your plastic.


Drizzle with a little Extra Virgin Olive Oil and some cracked Sea Salt. Toss well so all the pieces are coated with the oil.


Spread in a single layer on a baking sheet covered with parchment paper or on a baking stone and place in your oven on the middle rack at 450 degrees for 45 minutes to an hour.


They will shrivel and get dark, but that just means the natural sugars in the beets are caramelizing on the outside. This is when they become yummy. Up until this point... bleh. Do you see how they shrunk in size?


I served the roasted beets as a side to a grilled cheese sandwich. Don't skimp on this. If you're going to take the time and pamper yourself with a delicious roasted veggie with such a decadent color, make your own bread (like below) or buy some of your favorite bakery bread. Also, use good cheese. Not the highly processed logs or cheese slices packaged in individual pieces of plastic. It's like they are stored in their own personal plastic coffins. On this particular day I chose Muenster. It complimented the sweetness of the beets just perfectly!


I will say honestly, that beets are not my favorite vegetable. But I sure do like them made this way and will continue to serve them at my table simply because they are so healthy. I have not been able to convince my munchkins that roasted beets are yummy, but they do eat the small portion they are given without complaining anymore.

Sunday, July 25, 2010

Chipotle Butter & Roasted Corn

One of the telling signs at our home that summer has arrived is when I break out the Chipotle Butter. We found this recipe from a grilling cookbook and have made it every summer since. It is a huge hit with everyone in the family and makes your corn on the cob, rolls, fresh green beans, etc. taste so smoky and warm.

Here's just a little bit of back information before we move forward. You should always know a little something about the food you put in your body. Chipotle Peppers are smoked jalapeno chili peppers. These chilies are usually a dull tan to coffee color and measure approximately 2 to 4 inches in length and about an inch wide. As much as one fifth of the Mexican jalapeno crop is processed into chipotles.

What you'll need: 1 stick butter (8 Tbsp.), 1 chipotle pepper, fresh garlic, salt & pepper
Also... a coffee grinder (spice grinder)!

(I always make a double batch because we use it for more than just corn)

Place softened butter in a bowl. I don't use margarine. The idea of ruining something so delicious with a chemically altered oil product just doesn't seem right. Natural is best.


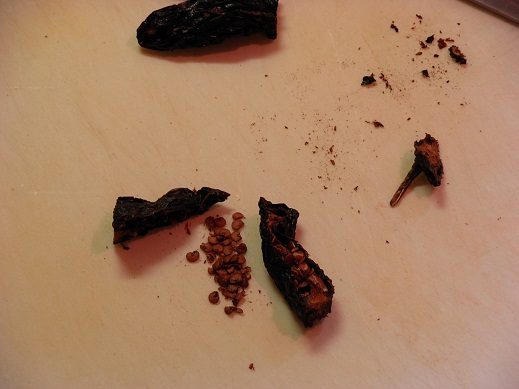
Cut the stems off the chipotle peppers, then cut them in half longways. This will give you the ability to remove the seeds if you want. I've heard the seeds carry more heat. I would use 1 medium sized chipotle per stick of butter. Then cut the halves into smaller pieces.


Place the chipotles in your coffee grinder and pulse until they are finely ground. Please heed the safety tip!!!

Safety Tip: Put the grinder on your stove and turn on the hood fan. This will suck up the spicy oils that are released into the air from grinding the peppers so fine. Keep the fan running when you take the top off the grinder too. If you don't do this, you will be choking. I guarantee it!


Next, pull apart the fresh garlic (1-2 cloves per stick of butter depending on your fondness for garlic. I would say use 3 extra large ones, but other people will be enjoying this besides myself). Remove all of the outer skin by twisting the clove between your fingers and peel away.


You can either mince your garlic or press it right into the bowl with the butter. I find pressing it to be much easier and less sticky.


Next add the salt and pepper to taste. Don't go too heavy on the pepper, or it may overwhelm the smoky flavor of the chipotle.


Go ahead and empty the chiptole powder into the butter. Tap out as much as you can. Be sure to wipe out the grinder with a damp cloth to remove all the chipotle oil or you will have an interesting cup of coffee tomorrow morning :)


Once you thoroughly combine the ingredients, turn the butter onto a sheet of plastic wrap. I always scoop some out into a small container to send home with my mom & step-dad. They love this stuff.


Use the plastic wrap to help you form a log about the length of a corn cob. Then wrap it up completely and refrigerate for at least an hour. Overnight is best so all the flavors can meld.


Roasting the Corn: Keeping the corn in the husk, soak it in water for about 1/2 hour. Throw it on the grill and cook on medium to high for 30-40 minutes. You want the husks to get burned, like in my picture below the corn is protected and steamy good on the inside. Please be aware that burned husks are a messy deal and I would recommend peeling them over a trash can. Only peel what you are going to eat right then. The husks will continue to keep the corn nice and hot if not peeled ahead of time.


Unwrap the chipotle butter log and place it on a plate. Lay your corn on top and start rolling.


Oh my gosh, this is smoky-melty-crispy-juicy-spicy goodness all over your face!!


I usually store the leftover chipotle butter in a container and use is to sauté fresh green beans, or over steamed broccoli. You can even put a pat of it on top of a perfectly grilled steak for some added zing. Oh Enjoy!