Showing posts with label vegetable. Show all posts

Sunday, October 31, 2010

Squash Quesadilla's

One of the more fun foods we have on occasion at our house is quesadilla's. You can put all sorts of things between two flour tortilla's and make a meal... or dessert (thin sliced apples, crushed nuts, honey). But on this particular day, my daughter was having her best friend spend the night and they had all sorts of fall activities planned. When I saw the idea of a squash quesadilla, I thought it was pretty cool. However, pureed squash and cheese just didn't give me the festive dinner I was looking for. So I improvised and what followed was a really delicious, fun meal that my family and our little guest requested I make again, very soon.

What you'll need: butternut squash, onion, olive oil, cilantro, chili powder, a 1/4 cup liquid (butter, heavy cream, chicken stock, veggie stock, etc.), cheese, flour tortilla's


Wash the outside of you squash, cut the top off, cut it in half and scoop out the seeds. Rub a little olive oil on the orange flesh and then place them flat side down on a cookie sheet covered in aluminum foil that has been rubbed with olive oil. Roast them in the oven for about 40 minutes at 375-400 degrees. You should be able to insert a knife through the rind easily when the squash is done cooking.


While your squash is roasting in the oven, dice an onion and put it in a large skillet with a drizzle of olive oil. Saute the onions on medium until they are translucent and slightly caramelized.


While the onions are caramelizing, chop up about 1 ounce or 1 bunch of cilantro. When the squash is done roasting, scoop it out and put it in the pan with the onions. Add 1 tsp of chili powder and 1/4 cup of liquid. If there isn't any liquid, it gets really thick.  Choose whichever liquid you like according to taste and diet. Also remember that all of these items so far have no seasoning, so salt and pepper would be appropriate at this time.


Stir it all up so it's nice and hot. Even with the 1/4 cup liquid, it's still going to be a little thick. That's a good thing because you don't want the mixture oozing out from between the tortilla's.


Take a large spoonful and spread it around on the tortilla leaving a 1 inch margin. This will allow for melting items to not escape as easily when they are pressed and heated.


Sprinkle with shredded cheese. Just a word to the wise, shred your own cheese. The cheese that you buy pre-shredded in a bag is packed with sawdust. Yep... I said sawdust. It probably reads on the bag as cellulose or something like that. They use the sawdust to keep the cheese from sticking in a big glob in the bag. So, unless you are seriously lacking in fiber, say no to the bag.


We were lucky enough to find a sweet little quesadilla press at a local store for a great price. If you don't have one of these beauties, a skillet on your stove top will work just fine. Put the tortilla with the squash mixture and the cheese on the bottom plate.


Top with another flour tortilla and close the press.


After 3 minutes, lift the lid and using a spatula transfer the quesadilla to a dinner plate.


Using a pizza wheel, cut the quesadilla on the pressed lines. You can serve them with sour cream, salsa or whatever you like best. When we make these again, we'll probably add some cayenne pepper for heat and a little garlic. Hope you enjoy them!

Friday, October 29, 2010

Butternut Squash


Have you ever looked at these in the grocery store and thought they were fall decorations that go next to the bumpy little gourds by the indian corn? I did for a really long time. Aside from their odd shape, they really aren't much to look at. Their drab color doesn't do much for them either. But once you get to know this gourd, you might find that it holds a lot of interest. It's mighty nutritious. Go here for more information on that, you won't be sorry. There are many ways to cook and serve it. My biggest goal in this particular blog, is to dispel the mystery on how to use it. My family likes it roasted, so that's what we're going to do.


Before you start, make sure you place a damp paper towel under your cutting board. This will keep your board from sliding as you maneuver this odd shaped vegetable.


There are two ways to peel it. You can use a pairing knife or a peeler. When using a knife, number one... use extreme caution. The outside layer is slick and hard. Peel around the top first.


Then run your knife down the side to the place where the squash bumps out.


Once you have peeled the top portion, cut it off so that the bottom is easier to handle.


Then use your knife to peel around the bottom. Again using extreme caution.


Now I don't know how many of you have this kind of peeler, but I am still questioning myself as to why I waited so long to get one. Maybe because it's not what I grew up using in my mom's house. But I broke down and bought one so I could see if it would make the job of peeling this monster easier. DON'T WAIT!!! Go buy yourself one right now! I will never be without this kind of peeler again.


It made ridiculously quick work of this squash. I almost had tears in my eyes it went so fast. Again... GO BUY ONE NOW!!!


I can't believe how struggle free it was. All done peeling in a matter of minutes and way safer. However, a side note would be that when I have used this peeler on smaller items like apples, I took a nice chunk out of my finger. So use a little more caution with the smaller produce.


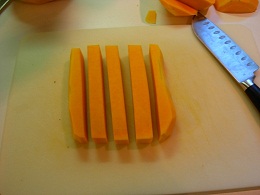
Take the top portion of the squash and cut it in 1/2 inch slices.


Then cut those in 1/2 inch slices


Then 1/2 inch chunks.


Next cut open the bottom half. This will look like the inside of a pumpkin since they are both squashes.


Use a spoon to scoop out the insides and discard. I suppose you could clean them off and roast them or dehydrate them like pumpkin seeds, but I've never tried it.


Cut the little bottom buttons off.


Then slice the bottom half into 1/2 inch slices.


Turn them on their sides for safety and cut these, one by one, into 1/2 inch pieces.


Throw them in a bowl, toss with some olive oil, sea salt and fresh cracked pepper.


Layer on a baking sheet and roast at 400 degrees for 45 minutes to an hour.


This is what not to do! I put too many on this sheet and when they were done roasting, some were burned and some were just soft. None of them caramelized and got yummy and sweet. Look back at the oven shot and see how they were sitting on top of each other. Now look at the picture below.


These are all in a single layer. They are crowded, but most importantly, they are in a single layer.


If you look at this, the only ones that burned were some small ones on the outside edge (that's normal). The other ones shrunk beautifully and caramelized like a champ. I serve these just as they are as a side to some sort of protein. If they aren't quite sweet enough for your young ones, you can drizzle a small amount of local maple syrup or some raw honey on top. We seem to do just fine without that though.

I really hope you try this if you've never liked this squash before (pureed, uck!) And if you've never tried it, I hope you will give it a go.

Monday, September 27, 2010

Zucchini & Yellow Squash


This is about the time of year when you run out of ideas of what to do with the bumper crop of squash you have raked in. There's the ever faithful Zucchini Bread recipe (I'm a huge fan) and I've even heard of Chocolate Zucchini Muffins. But at our house, we like yellow squash too and the two seem to go hand in hand.

This is a fast and easy way to make a healthy side dish that is full of flavor. Do you have one of these? It's called a mandolin. It makes quick work of items that need sliced thinly. If you don't have one, a sharp knife will do the job.


I use the mandolin to slice the zucchini right into my sauté pan. Discard the bottom and use the stem to hold on to while you are slicing.


Do the same with the yellow squash. However, you will notice that this one started to get a little big because there are seeds developing. It really is true that you want to pick the smaller squashes than larger. It still tastes good, but they just don't look as nice when they cook up.


Depending on how well you like garlic, put in as much as you like. But it is best to use fresh when doing a dish like this. Just give it a good whack to get the shell off and then either mince or press it right into the pan with the squash.


Depending on how much heat you want, add some red pepper flake. Even if you think you don't want it spicy, just add some to give it a little life. And then drizzle with olive oil.


Now this is the point where you put the lid on and let it steam on medium high. But if you're me, your biggest sauté pan did not come with a lid. So I cover it with foil and let it vent out the back. Take the lid/foil off every once in awhile to stir things up. I'm a fan of tongs. They are great for grabbing and flipping things. Think of them like extended hands that won't get burned. A very useful tool.


Once the squash gets transparent, they are pretty much done. You can serve this with fresh sliced tomato and a little freshly shredded Parmesan cheese. This is best piping hot, so make sure it is the last thing you finish before you plate your dinner.


It really is low maintenance and a fast way to use up your surplus garden stock. Enjoy!

Monday, September 20, 2010

Basil and Tomatoes for Dinner


Some pictures don't need heavy words.

Huge, heirloom tomatoes, freshly torn basil from my home, coarse sea salt, olive oil & fresh cracked pepper.


Oh and just a bit of buffalo mozzarella.

Dinner was glorious this evening. 
Enjoyed from our 3-Season room with the crickets, squirrels and lots of laughter.

My family's favorite joke of the evening:

Why did they invited the mushroom to the party?
Because he was a fungi.

Why did they ask him to leave?
Because he took up too mushroom.

Sunday, August 8, 2010

Fried Green Tomatoes

Not only is Fried Green Tomatoes one of my all-time favorite movies, but it's a pretty good side dish as well. When it comes to making these, I usually wing it. But I thought I would try a recipe just to see if I was doing it right. Yep... I was. It never hurts to have the measurements to refer to and I always seemed to run out of the bread crumb mixture, so I doubled that part and made it through the process without having to make more.

What you'll need: green tomatoes, milk, eggs, white flour, italian bread crumbs, cornmeal, salt, pepper, vegetable oil, hot sauce (optional) Refer to the recipe for exact measurements.


What's that? Did I get these tomatoes at my local Farmer's Market? Why yes, yes I did!
Wash & cut the tomatoes in about 1/4 inch slices. Go ahead and discard the top and bottom pieces. They don't hold the coating well at all.


After all the tomatoes are sliced, pour about 1/2 inch of oil in a large skillet and heat on the medium setting for your stove top. In a bowl, whisk together the milk & eggs just until combined.


Place white flour on a plate. I was taught that all good food has levels of flavor. So if you go through one of your levels that is critical to the success of the dish and it lacks flavor... add it. So when I get the flour ready for coating, I add a little salt & pepper. You can also add hot sauce to your egg mixture. Just be aware of the likes of your consumers.


Combine on the next plate, the Italian bread crumbs, corn meal, salt & pepper. I am a huge fan of coarse, stone-ground cornmeal. One of the best places to get it is at your county fair. Our county fair has a very old machine that makes a loud popping sound as it grinds the corn. The kids from 4-H sell it in brown lunch bags at a very good price. I typically will buy enough to last the whole year and store it in freezer bags in my deep freeze with the date clearly marked. It gives a great texture to baked items. But I digress, ahem, use a small grind cornmeal for this recipe.


Be sure to set up your station right next to where you will be frying these green lovelies. I like to work in a clockwise manner.


Press the tomato into the flour, flip & repeat.


Dip the flour coated tomato in the milk/egg mixture, a.k.a egg wash.


For this next step you may have to move a little quick. If you don't get the crumb mixture pressed on the tomato quickly, the egg wash may "roll" away and leave the flour coating showing through. You don't want this to happen. Why? I'll tell you. The flour coating seals the tomato and keeps the oil from penetrating the vegetable too much. The egg wash is to give the crumb mixture something to grab onto. If the egg wash rolls away, the crumb mixture won't stick and your left with bald spots on your tomatoes. And bald spots are only cute on babies :) Tap off any extra crumb mixture.


Fry only as many tomatoes as you have room, without crowding them. If you crowd them, the temperature of the oil will drop and you'll end up with soggy tomatoes. Once they brown, flip them (I use tongs) and let the other side brown. I drained them on a cookie sheet with several layers of paper towels.


Now these are truly yummy on their own, but when I was speeding through the local grocery knowing what I was making for dinner that night, I was stopped dead in my tracks when I saw these hot sauces. I'm usually pretty darn savvy when it comes to the avoidance of end caps in the grocery store and I am not wooed by fancy packaging. But the caps on these bottles were the most beautiful, earthy shades of wood. A very unexpected sight in a grocery where they make products scream at you. Upon further inspection, I saw that one was a Chipotle (fav!) and the other was Chile Lime (love lime!). I knew they would pair really well with this typical southern dish.


After making the tomatoes, I realized that I didn't plan for a main dish. Truth be told, I'm not a fan of frying things and for me, the process seems labor intensive. So the idea of producing a protein at the same time was a bit much. Maybe I could roast a chicken in the oven and then make the tomatoes. Better yet, have The Hubby grill something tasty. Anyway, I ended up serving this with a five-grain crusty bread. I'll plan better next summer when I make these again.