Monday, August 23, 2010

Making Cream Cheese

If I had known it was this simple, I would have done it a long time ago. I had no idea how easy it was and then when it was done, there was this early American, back to grass roots, satisfaction with the end product. That is until I did a little more research online to see if I had done it right. From what I can understand, I started the process at the half way through point. You can read about it here, but it has something to do with the right pH level and heating of milk. However, my kids and I had a great time with our little experiment and look forward to "making" cream cheese often.

Items you'll need: Organic, low fat, plain yogurt, 2 bowls, 2 cotton towels and something to tie it all up (yarn, twine, etc.)


Take one of the cotton towels and line a bowl with it. If there is a fuzzy side and a flat side, be sure to put the flat side up. It's easier to pull the cheese off the towel when it is finished. 


Pour half of the carton of yogurt in the towel. You will want to divide the carton between two towels and two bowls. If you don't, there's a chance the inside of the cheese will not dry out enough during the process.


Pull up the side of the towel to make a sort of package and tie it securely with your string. Use enough string so that there is leftover to make a loop. Slip the loop over a knob or hook somewhere in your kitchen with the bowl resting underneath. You will need to let it drip for a minimum of 6 hours. Overnight is probably best.


The liquid that drips out is whey. You can either discard the whey, or use it to lacto-ferment vegetables and fruits. I will be blogging about that soon. What was left after we let it hang for 6 hours was a very creamy version of cream cheese. Every single person in my family loved it and agreed we should no longer purchase the store brands. This was easier to spread on bagels and will make a nice low-fat substitute for butter. I will have to see how well it works in a recipe that calls for the processed store bought version. I think the next time I make it (tomorrow) I will hang it overnight and see if it doesn't get a little drier with the longer hanging time.

All in all, we were very pleased with the outcome and would recommend to anyone to give it a whirl.

Monday, August 16, 2010

Easy Jesus


Have you ever used a can of Easy Cheese?

More on that later.

A while back I was listening to a teaching where one of my pastors was talking about some missionaries from my church. They hadn't always been missionaries. They were just like us. They met, got married, held jobs, bought a home, had a child, raised a child and so on. And yet they came to a point in their lives where they took Jesus at his word.

Jesus looked at him and loved him. "One thing you lack," he said. "Go, sell everything you have and give to the poor, and you will have treasure in heaven. Then come, follow me." Mark 10:21

Really? They actually, literally, with wild abandon took Jesus at his word. They sold everything they had and went to Haiti to be missionaries, to reach out to the people of that nation that were hurting and shared Jesus' love with them. Their sacrifice was huge by our standards, heck, by any standard. But that certain phrase my pastor said was what stuck with me. That phrase... took Jesus at his word. How many times have I read the Bible? Countless. There are over 600 commands. Did you know that? There aren't just 10, there are 613 commands. And yet my life is not radically different than it was 5 years ago. But I have read these commands. I have read the word's of Jesus. Why haven't I taken Jesus at his word?

As an American I lead a comfortable life. I am accustomed to it. It is part of my culture. And when I am not comfortable, I complain. And if I don't outwardly complain, I certainly do a good job of complaining on the inside. So when I take the time to read the Bible, and I read a command like "sell everything you have and follow me" I don't take Jesus at his word, I adapt it to fit my comfortable life. Certainly God doesn't want all of us to sell our things and give it to the poor. Then we would be poor and the poor would be rich and what good could come from that. It's just a role reversal. He must want me to interpret this so it fits my life. Ummmmm, let's see... Jesus wants me tooooo... sell out to the idea of giving everything I have (time, energy, a little bit of my money (because I don't have much to spare), etc.) to the poor aaand... follow God the best I can in my given circumstance. Yep, that sounds OK. Now how can I make that fit into my schedule of being a wife, mom & employee?
Back to the Easy Cheese. Easy Cheese is a processed, chemically altered food product that is extruded from a metal can onto any surface with the idea that it will be consumed. What's really neat about the end of the can is that it has this tip that can make pretty star shapes if you position it just right over a cracker when you squeeze. And if you don't want the star pattern, you can make swirls, zig-zags, polka dots, smiley faces, etc. You can squeeze out cheese to fit any cracker, veggie, trail bologna, sandwich bread, you name it, the possibilities with Easy Cheese are endless. But if you really take cheese back to it's original roots, it wasn't meant to be expelled from a can. It was made from a natural source, animal milk and naturally occurring bacteria. But factory-made cheese overtook traditional cheesemaking in the World War II era, and factories have been the source of most cheese in America and Europe ever since. Today, Americans buy more processed cheese than "real", factory-made or not.

And so with most things, I sacrifice what is good and right, in an attempt to make my life easier. And so I have this Easy Jesus. Where I take his Words in their purest form, read them, and then squeeze them out to fit my life. This season of life is shaped like this particular brand of cracker, so I'll just squeeze my Easy Jesus and what I learned about him this week so he fits into where I am and what I'm doing. Or I'll hear a really good teaching and I'll squeeze my Easy Jesus into a star shape so I remember that one for hopefully longer than the others. But another fact about Easy Cheese... when you get to the place where the can is almost empty it gets more difficult to squeeze the cheese out. It can even leave a nice dent in your finger from pushing on the point so firmly to get that last bit of cheese.

That's kind of where I am now. I have been dispensing my Easy Jesus for so long that I have this dent in my life and I feel like I'm coming to the end of this phase and it's getting harder to read the Bible and not take God at his word. And I don't know what that looks like for me, but I can definitely say that it probably won't be comfortable, it won't be safe (by my standards) and it won't be easy. It's getting harder to squeeze my Easy Jesus each week and I think it's time to get rid of the canned crap that I've been selling myself for years and go back to what He originally wanted to do with me. He wants me to "Love one another".

As I am learning more about what love is, I see that it can take on more forms than I thought possible. And with all of the needs out in my community, surely I can find a unique way to love. Something that reflects what I have learned and not used. And then I won't have to worry about squeezing my Jesus to fit my circumstance. I'll just let him take me back to my natural state and form me into this amazing person that can be molded by Him and aged to the point where my "Love one another" is a wonderful aroma to him. Because even the stinky cheeses can smell good to some people. So while I'm trying to figure this life out, without my canned Jesus, I might stink up the joint with my attempts.

Do you think God uses a clothes pin on his nose when we mess up?


Sunday, August 8, 2010

Fried Green Tomatoes

Not only is Fried Green Tomatoes one of my all-time favorite movies, but it's a pretty good side dish as well. When it comes to making these, I usually wing it. But I thought I would try a recipe just to see if I was doing it right. Yep... I was. It never hurts to have the measurements to refer to and I always seemed to run out of the bread crumb mixture, so I doubled that part and made it through the process without having to make more.

What you'll need: green tomatoes, milk, eggs, white flour, italian bread crumbs, cornmeal, salt, pepper, vegetable oil, hot sauce (optional) Refer to the recipe for exact measurements.


What's that? Did I get these tomatoes at my local Farmer's Market? Why yes, yes I did!
Wash & cut the tomatoes in about 1/4 inch slices. Go ahead and discard the top and bottom pieces. They don't hold the coating well at all.


After all the tomatoes are sliced, pour about 1/2 inch of oil in a large skillet and heat on the medium setting for your stove top. In a bowl, whisk together the milk & eggs just until combined.


Place white flour on a plate. I was taught that all good food has levels of flavor. So if you go through one of your levels that is critical to the success of the dish and it lacks flavor... add it. So when I get the flour ready for coating, I add a little salt & pepper. You can also add hot sauce to your egg mixture. Just be aware of the likes of your consumers.


Combine on the next plate, the Italian bread crumbs, corn meal, salt & pepper. I am a huge fan of coarse, stone-ground cornmeal. One of the best places to get it is at your county fair. Our county fair has a very old machine that makes a loud popping sound as it grinds the corn. The kids from 4-H sell it in brown lunch bags at a very good price. I typically will buy enough to last the whole year and store it in freezer bags in my deep freeze with the date clearly marked. It gives a great texture to baked items. But I digress, ahem, use a small grind cornmeal for this recipe.


Be sure to set up your station right next to where you will be frying these green lovelies. I like to work in a clockwise manner.


Press the tomato into the flour, flip & repeat.


Dip the flour coated tomato in the milk/egg mixture, a.k.a egg wash.


For this next step you may have to move a little quick. If you don't get the crumb mixture pressed on the tomato quickly, the egg wash may "roll" away and leave the flour coating showing through. You don't want this to happen. Why? I'll tell you. The flour coating seals the tomato and keeps the oil from penetrating the vegetable too much. The egg wash is to give the crumb mixture something to grab onto. If the egg wash rolls away, the crumb mixture won't stick and your left with bald spots on your tomatoes. And bald spots are only cute on babies :) Tap off any extra crumb mixture.


Fry only as many tomatoes as you have room, without crowding them. If you crowd them, the temperature of the oil will drop and you'll end up with soggy tomatoes. Once they brown, flip them (I use tongs) and let the other side brown. I drained them on a cookie sheet with several layers of paper towels.


Now these are truly yummy on their own, but when I was speeding through the local grocery knowing what I was making for dinner that night, I was stopped dead in my tracks when I saw these hot sauces. I'm usually pretty darn savvy when it comes to the avoidance of end caps in the grocery store and I am not wooed by fancy packaging. But the caps on these bottles were the most beautiful, earthy shades of wood. A very unexpected sight in a grocery where they make products scream at you. Upon further inspection, I saw that one was a Chipotle (fav!) and the other was Chile Lime (love lime!). I knew they would pair really well with this typical southern dish.


After making the tomatoes, I realized that I didn't plan for a main dish. Truth be told, I'm not a fan of frying things and for me, the process seems labor intensive. So the idea of producing a protein at the same time was a bit much. Maybe I could roast a chicken in the oven and then make the tomatoes. Better yet, have The Hubby grill something tasty. Anyway, I ended up serving this with a five-grain crusty bread. I'll plan better next summer when I make these again.


A Simple Misunderstanding

It was a day that wasn't quite the norm. I actually got to sleep in. The Hubby had to go to a commitment that morning, so he popped his head in the bedroom, gave a few updates and left. Needless to say, in my groggy state I took what he said and interpreted it differently than intended. I sleepily crawled out of bed.

For the next 2 hours, my irritation with the situation elevated. It never ceases to amaze me that the ghosts from my past can still influence how I see things in the present day. By the time The Hubby came home I was in full fledge anger. True to form, he didn't want whatever was bothering me to last all day, and he prompted a discussion to figure out what had gone so horribly wrong in the short time he had been gone.

Needless to say the discussion was taking place in the kitchen which is at the center of our home. As with some arguments, the level was rising as we tried to get to the bottom of the problem. But what was interesting was the response of our son. My son entered the room first, followed by our daughter. This is pretty true to form, wherever he goes, she is not far behind. Even though I was the one loudly expressing my feelings, our son went straight to me, stood beside me and touched my arm. "What's happening? You guys don't fight. You're always so unified." Yes... he said unified LOL! By this time, this arguement needed a break and a change of perspective. It was a great opportunity to talk to our kids about the realities of marriage.

They may never see us fight, but we do have disagreements from time to time. We spent a lot of time in discussion before we got engaged about various things that could potentially trip up a marriage to make sure we were on the same page. We truly believe that this is one of the main reasons we hardly argue. We do see almost all things eye to eye.

After some time, they understood that just because we were arguing didn't mean we were getting a divorce like some of their friends parents had. This was our way of avoiding that, by talking out our issues rather than letting them build up. But another interesting point from this whole scenario was that our son had come to me even though I was the one being loud with The Hubby. Even though I was the aggressor when he walked in the room, he still came to my defense. If not verbally, than physically. He was literally standing between The Hubby and I as if to protect me from an unpleasant situation.

We talked about that little dynamic after the kids left the room. He puffed out his chest and stated that he would not have it any other way. He is proud of our son for the protection he shows the women in his life. I love to see how words said in passing can stick with these little brains and manifest themselves into very noticeable actions that can make a big impact. We've talked to our son on more than one occasion about his role in the protection of his little sister. But to see him convey that to me was something new.

My little buddy is growing up and understanding so much more than I give him credit for. I think this is just another wake up call for me that I am entering the phase of "less instruction", not "no instruction". He still needs direction at this tender age. I need to watch more, speak less but be continually present and available for those times when I am needed.

Thursday, July 29, 2010

Beautiful Bounty

I have heard others speak of going to a farmer's market and thought, who would seriously want to go shop somewhere where you are only buying vegetables that could comfortably be bought at my local grocery, in the air conditioning with all the other things that I needed to buy on my list. But it wasn't until I went that I realized the variety of items you could purchase. The biggest pull of course is the local produce, but there are also, free-range meats, homemade jams, scratch made pastries, bagels, breads, local honey, flowers, local maple syrup, and items made all from beeswax.

What is great, is that I have pretty much replaced my grocery store shopping with the farmer's market. I have only bought a few items from the store the past few weeks to supplement my menu plans.

Below is a picture of the beautiful bounty I brought home left to right, front to back:
garlic, green tomato, red tomato, hot peppers, green tomato, beets, asiago cheese bagels, zucchini, yellow squash, free-range ground beef, 2 dozen ears corn


Since my kiddos were spending the night at grandma's, a big plate of veggies was perfect for dinner. Roasted beets, sautéed yellow squash & zucchini with garlic and fresh tomato with balsamic vinegar.


The tomato was so flavorful with the balsamic vinegar & fresh cracked pepper. But, some of the vinegar leaked over to the beet side of the plate and that did not make the beets taste good to me. A tiny drizzle of local honey made it better.


Do I usually eat a plate of just veggies for dinner? No. But I figured since I had an ice cream cone for lunch that this was probably my best choice. LOL! Some day I will learn, but I'm doing better than I was before.

Monday, July 26, 2010

Roasted Beets

Here's a great way to start a food blog... I'm not a fan of beets.

At least I'm not a fan of how other people make them. Beets come canned, in balls as a garnish in a salad, as Harvard Beets and probably some other ways I don't want to try. None of these have captured my fancy. However, I read an article in Martha Stewart's Living magazine a long time ago that touted the wonders of roasting vegetables and it changed my perspective on many veggies I have disliked in the past. One in particular is butternut squash. I turned my nose up to every way I had ever tasted it, until I roasted it and now we love eating it. We've also roasted parsnips, carrots, and leeks and have had great success with those too.

My drive in trying the beets roasted was that I had learned the deeper the color of your veggie, typically the more nutrients they pack in. The darker your lettuce, the more worth eating it is. Iceberg lettuce is a waste of time. It's like eating crunchy water... just say no. So when I was picking my way through our local farmer's market, which by the way carries more than fruits & veggies, I noticed a small organic stand. Truth be told, it was the only organic stand there. What a sad statement. However, the produce they (ahem) produced, was beautiful. They are smaller, not perfect, and not blown up and out of proportion to suit the likes & tastes of American consumers. What caught my attention were these small, almost golf ball sized beets. I simply had to buy them. This was my opportunity to give these deep colored menaces one final chance on my plate. I am so glad I did. Enjoy the journey of color below!

Only wash your beets when you're ready to roast them. It's the same concept as strawberries. They go bad quicker once they've been washed.


I run them under warm water and use a scrubby to scrub all the dirt off. You're supposed to peel them, but if they're organic I don't see the point. They were delicious this way and didn't need peeled. But do as you like... it's your beet :)


As I scrubbed them, I laid them on a paper towel to drain. It was like watching tie-dying happen because they "bleed" their liquid once scrubbed.


Because the liquid does stain, I use a kitchen glove on one hand. Cut off the top & the bottom.


Then cut in half, then slices, then cubes. They were around 1/2 inch square.


Put the cubed beets in a glass bowl. Why glass? So it doesn't stain your plastic.


Drizzle with a little Extra Virgin Olive Oil and some cracked Sea Salt. Toss well so all the pieces are coated with the oil.


Spread in a single layer on a baking sheet covered with parchment paper or on a baking stone and place in your oven on the middle rack at 450 degrees for 45 minutes to an hour.


They will shrivel and get dark, but that just means the natural sugars in the beets are caramelizing on the outside. This is when they become yummy. Up until this point... bleh. Do you see how they shrunk in size?


I served the roasted beets as a side to a grilled cheese sandwich. Don't skimp on this. If you're going to take the time and pamper yourself with a delicious roasted veggie with such a decadent color, make your own bread (like below) or buy some of your favorite bakery bread. Also, use good cheese. Not the highly processed logs or cheese slices packaged in individual pieces of plastic. It's like they are stored in their own personal plastic coffins. On this particular day I chose Muenster. It complimented the sweetness of the beets just perfectly!


I will say honestly, that beets are not my favorite vegetable. But I sure do like them made this way and will continue to serve them at my table simply because they are so healthy. I have not been able to convince my munchkins that roasted beets are yummy, but they do eat the small portion they are given without complaining anymore.

Sunday, July 25, 2010

Chipotle Butter & Roasted Corn

One of the telling signs at our home that summer has arrived is when I break out the Chipotle Butter. We found this recipe from a grilling cookbook and have made it every summer since. It is a huge hit with everyone in the family and makes your corn on the cob, rolls, fresh green beans, etc. taste so smoky and warm.

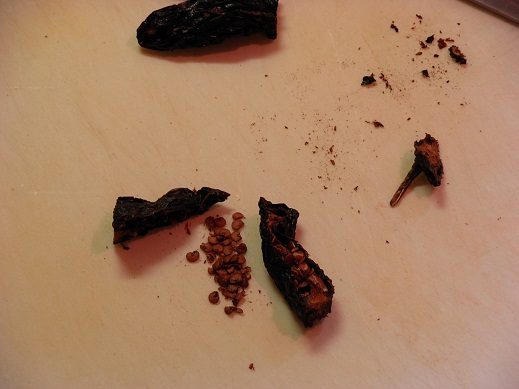
Here's just a little bit of back information before we move forward. You should always know a little something about the food you put in your body. Chipotle Peppers are smoked jalapeno chili peppers. These chilies are usually a dull tan to coffee color and measure approximately 2 to 4 inches in length and about an inch wide. As much as one fifth of the Mexican jalapeno crop is processed into chipotles.

What you'll need: 1 stick butter (8 Tbsp.), 1 chipotle pepper, fresh garlic, salt & pepper
Also... a coffee grinder (spice grinder)!

(I always make a double batch because we use it for more than just corn)

Place softened butter in a bowl. I don't use margarine. The idea of ruining something so delicious with a chemically altered oil product just doesn't seem right. Natural is best.


Cut the stems off the chipotle peppers, then cut them in half longways. This will give you the ability to remove the seeds if you want. I've heard the seeds carry more heat. I would use 1 medium sized chipotle per stick of butter. Then cut the halves into smaller pieces.


Place the chipotles in your coffee grinder and pulse until they are finely ground. Please heed the safety tip!!!

Safety Tip: Put the grinder on your stove and turn on the hood fan. This will suck up the spicy oils that are released into the air from grinding the peppers so fine. Keep the fan running when you take the top off the grinder too. If you don't do this, you will be choking. I guarantee it!


Next, pull apart the fresh garlic (1-2 cloves per stick of butter depending on your fondness for garlic. I would say use 3 extra large ones, but other people will be enjoying this besides myself). Remove all of the outer skin by twisting the clove between your fingers and peel away.


You can either mince your garlic or press it right into the bowl with the butter. I find pressing it to be much easier and less sticky.


Next add the salt and pepper to taste. Don't go too heavy on the pepper, or it may overwhelm the smoky flavor of the chipotle.


Go ahead and empty the chiptole powder into the butter. Tap out as much as you can. Be sure to wipe out the grinder with a damp cloth to remove all the chipotle oil or you will have an interesting cup of coffee tomorrow morning :)


Once you thoroughly combine the ingredients, turn the butter onto a sheet of plastic wrap. I always scoop some out into a small container to send home with my mom & step-dad. They love this stuff.


Use the plastic wrap to help you form a log about the length of a corn cob. Then wrap it up completely and refrigerate for at least an hour. Overnight is best so all the flavors can meld.


Roasting the Corn: Keeping the corn in the husk, soak it in water for about 1/2 hour. Throw it on the grill and cook on medium to high for 30-40 minutes. You want the husks to get burned, like in my picture below the corn is protected and steamy good on the inside. Please be aware that burned husks are a messy deal and I would recommend peeling them over a trash can. Only peel what you are going to eat right then. The husks will continue to keep the corn nice and hot if not peeled ahead of time.


Unwrap the chipotle butter log and place it on a plate. Lay your corn on top and start rolling.


Oh my gosh, this is smoky-melty-crispy-juicy-spicy goodness all over your face!!


I usually store the leftover chipotle butter in a container and use is to sauté fresh green beans, or over steamed broccoli. You can even put a pat of it on top of a perfectly grilled steak for some added zing. Oh Enjoy!